Troubleshooting Dockerfile Builds with Checkpoint Containers
The scene
I recently ran into some problems compiling code while building a docker image using a Dockerfile. The compile process wasn't working, so the failed `make install` was stopping the container image from being built. There's 3 ways I could have approached troubleshooting this failed build. I used what I'm calling a "checkpoint container" to troubleshoot quickly and get back on track with the rest of the build process.Dockerfile quick tour
Dockerfiles are an ordered list of instructions for the `docker build` process. Each instruction results in a layer of the image with the results of whatever commands were executed. RUN instructions execute commands in a shell and modify the file system, COPY instructions copy files from the working directory on the host into the specified location in the container, and so on. You can get more info on the Dockerfile and the build process [on the web](https://docs.docker.com/engine/tutorials/dockerimages/#/building-an-image-from-a-dockerfile) Let's take a quick look at the Dockerfile. This is the build that was failing: ------ # Derived from instructions here https://gist.github.com/lucasoldaini/2d548cafa7ea4d147aa2bb1c7cd393cc FROM rhel7 # Needs rhel-7-server-optional-rpms enabled on the docker host that builds the container RUN yum repolist && yum-config-manager --enable rhel-7-server-optional-rpms && \ INSTALL_PKGS="gcc-gfortran gcc binutils autoconf automake make git python-setuptools Cython python-devel" && yum -y install $INSTALL_PKGS RUN git clone https://github.com/xianyi/OpenBLAS && git clone https://github.com/numpy/numpy.git # OpenBLAS build section WORKDIR /OpenBLAS COPY OpenBLAS.conf /etc/ld.so.conf.d/ RUN git checkout tags/v0.2.18 && \ make CC="gcc -m64" FC="gfortran -m64" TARGET= && \ make install && \ ldconfig # NumPY build section COPY site.cfg /numpy/ WORKDIR /numpy RUN unset CPPFLAGS && \ unset LDFLAGS && \ python setup.py build --fcompiler=gnu95 && \ python setup.py install # SciPY build section WORKDIR / RUN git clone https://github.com/scipy/scipy.git RUN yum -y install gcc-c++ WORKDIR /scipy RUN git checkout tags/v0.15.1 RUN python setup.py config_fc --fcompiler=gnu95 install WORKDIR / ADD experiments.tar /tmp/ # docker run /tmp/benchmark ENTRYPOINT ["python"] CMD ["--help"] ------ While it's not important to discuss what OpenBLAS is, just know that the libraries built are optimized to the machine based on compile time flags for specific optimizations. The compile of OpenBLAS happening in the container was creating a library with a different name than the install section of the Makefile expected. I had to see what the result of the compile was in the source directory, but the build failed so no container existed.Change the Dockerfile and rebuild
This is probably the most common way folks would look at troubleshooting a docker container image build. Simply look at the instruction that failed, interpret the output from the build, and modify the instruction. Then we can re-run the build to see what happens. This is a very simple way to troubleshoot, but has the disadvantage of re-running the build every time. If the instruction that needs to change is the failed instruction, e.g. adding another package to a list of RPMs, then the build will start from the cache at that point. This would be very fast. If the instruction is from a previous layer, then all of the intermediate instructions would be re-run as well. This could take a while if, say, we need to update the list of RPMs to add a library, which would results in reinstalling all the RPMs. The resulting Dockerfile may not be the most optimized, but it will create reproducible images. Overall, this is fairly low drag, and therefore common. The downfall comes when the output from the failed instruction isn't clear. If you need to see what winds up on the disk, like in my compiler / installer mismatch, you are out of luck. The `make` was creating **something**, but it wasn't making the something that `make install` needed. So I needed to see the artifacts being created on disk.Build in fresh container and record steps
When we need to be able to interact with the container build artifacts, many folks will turn to launching the base layer container, getting a shell, doing the work, and recording actions for use in a Dockerfile for later builds. This provides the most control and is just like troubleshooting compiling on a workstation. If the compile fails, we can just change the flags and try again. Once we've gotten a good build, we can take the notes of what RPMs needed to be installed, the flags to send `make`, additional files and configs that need to be updated, and create individual instructions in a Dockerfile. The resulting Dockerfile will be clean and we can apply some optimizations to the docker build process right out of the gate. However, this is fairly high friction. We're doing most of the work just like a workstation, which ignores the benefits of using the build system in the first place. We're human, we may forget to write things down, the Dockerfile might miss steps we did in the shell. Plus, after all our work, we still need to run a `docker build` to get our final container image. Not the optimal way to use the tools at hand.Create a checkpoint container
I needed a method that combined the two approaches: using the built-in build system and getting a shell in a container as close to the failure point as possible. It turns out we can do that by taking advantage of how the `docker build` process works. First, we need to take a look at how images are created.Docker image sidebar
Docker images are composed of file system layers, each subsequent action done on a new copy-on-write layers. You've probably seen an image that looks something like this: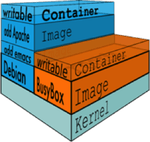 *image credit: https://blog.docker.com/2015/10/docker-basics-webinar-qa/*
During the `docker build` process, each instruction starts a new container based on the previously committed layer, executes the instruction, and commits the new layer if the instruction succeeds. At the end of the process, the tags you provided to `docker build` are applied and you wind up with an image named the way you expected, like `myuser/python`.
When we run `docker build -t oblasbench .` , ends up like this:
------
...
Step 16 : ENTRYPOINT python
---> Using cache
---> 305e4fec274d
Step 17 : CMD --help
---> Using cache
---> 61db194d3341
Successfully built 61db194d3341
------
If we look at `docker images oblasbench`, we can see that the *Image ID* from the last line of our `docker build` output is the same as the *Repository* named `oblasbench`.
------
REPOSITORY TAG IMAGE ID CREATED SIZE
oblasbench latest 61db194d3341 About an hour ago 1.716 GB
------
The `docker history` command will show all of the layers in the image, and the instruction that created that particular committed image layer. In our final `oblasbench` image, the history looks like:
------
docker history oblasbench
IMAGE CREATED CREATED BY SIZE COMMENT
61db194d3341 2 hours ago /bin/sh -c #(nop) CMD ["--help"] 0 B
305e4fec274d 2 hours ago /bin/sh -c #(nop) ENTRYPOINT &{["python"]} 0 B
8d7ceffddb35 2 hours ago /bin/sh -c #(nop) ADD file:022ac50b30e13899a7 950 B
cea9f5659716 2 hours ago /bin/sh -c #(nop) WORKDIR / 0 B
e05be23d6d9e 2 hours ago /bin/sh -c git checkout tags/v0.15.1 && pytho 430.9 MB
e3620ef166bf 21 hours ago /bin/sh -c #(nop) WORKDIR /scipy 0 B
be9441cf906f 21 hours ago /bin/sh -c git clone https://github.com/scipy 149.4 MB
75ce175ecb1d 21 hours ago /bin/sh -c #(nop) WORKDIR / 0 B
12ad8af87ec5 21 hours ago /bin/sh -c unset CPPFLAGS && unset LDFLAGS && 104.5 MB
a859bf459a63 21 hours ago /bin/sh -c #(nop) WORKDIR /numpy 0 B
a15d69323775 21 hours ago /bin/sh -c #(nop) COPY file:bc1117294ca0a9cf9 238 B
8a9df662fb35 21 hours ago /bin/sh -c git checkout tags/v0.2.18 && make 120.7 MB
20a1fbb0d798 21 hours ago /bin/sh -c #(nop) COPY file:0aefaff87b25769f6 18 B
01aaf43c0d50 22 hours ago /bin/sh -c #(nop) WORKDIR /OpenBLAS 0 B
bbe3500e7e2d 22 hours ago /bin/sh -c git clone https://github.com/xiany 179.7 MB
7f0e79eee3c5 22 hours ago /bin/sh -c yum repolist && yum-config-manager 528.8 MB
4a6b6e1a17d7 4 weeks ago 201.6 MB Created by Image Factory
------
*image credit: https://blog.docker.com/2015/10/docker-basics-webinar-qa/*
During the `docker build` process, each instruction starts a new container based on the previously committed layer, executes the instruction, and commits the new layer if the instruction succeeds. At the end of the process, the tags you provided to `docker build` are applied and you wind up with an image named the way you expected, like `myuser/python`.
When we run `docker build -t oblasbench .` , ends up like this:
------
...
Step 16 : ENTRYPOINT python
---> Using cache
---> 305e4fec274d
Step 17 : CMD --help
---> Using cache
---> 61db194d3341
Successfully built 61db194d3341
------
If we look at `docker images oblasbench`, we can see that the *Image ID* from the last line of our `docker build` output is the same as the *Repository* named `oblasbench`.
------
REPOSITORY TAG IMAGE ID CREATED SIZE
oblasbench latest 61db194d3341 About an hour ago 1.716 GB
------
The `docker history` command will show all of the layers in the image, and the instruction that created that particular committed image layer. In our final `oblasbench` image, the history looks like:
------
docker history oblasbench
IMAGE CREATED CREATED BY SIZE COMMENT
61db194d3341 2 hours ago /bin/sh -c #(nop) CMD ["--help"] 0 B
305e4fec274d 2 hours ago /bin/sh -c #(nop) ENTRYPOINT &{["python"]} 0 B
8d7ceffddb35 2 hours ago /bin/sh -c #(nop) ADD file:022ac50b30e13899a7 950 B
cea9f5659716 2 hours ago /bin/sh -c #(nop) WORKDIR / 0 B
e05be23d6d9e 2 hours ago /bin/sh -c git checkout tags/v0.15.1 && pytho 430.9 MB
e3620ef166bf 21 hours ago /bin/sh -c #(nop) WORKDIR /scipy 0 B
be9441cf906f 21 hours ago /bin/sh -c git clone https://github.com/scipy 149.4 MB
75ce175ecb1d 21 hours ago /bin/sh -c #(nop) WORKDIR / 0 B
12ad8af87ec5 21 hours ago /bin/sh -c unset CPPFLAGS && unset LDFLAGS && 104.5 MB
a859bf459a63 21 hours ago /bin/sh -c #(nop) WORKDIR /numpy 0 B
a15d69323775 21 hours ago /bin/sh -c #(nop) COPY file:bc1117294ca0a9cf9 238 B
8a9df662fb35 21 hours ago /bin/sh -c git checkout tags/v0.2.18 && make 120.7 MB
20a1fbb0d798 21 hours ago /bin/sh -c #(nop) COPY file:0aefaff87b25769f6 18 B
01aaf43c0d50 22 hours ago /bin/sh -c #(nop) WORKDIR /OpenBLAS 0 B
bbe3500e7e2d 22 hours ago /bin/sh -c git clone https://github.com/xiany 179.7 MB
7f0e79eee3c5 22 hours ago /bin/sh -c yum repolist && yum-config-manager 528.8 MB
4a6b6e1a17d7 4 weeks ago 201.6 MB Created by Image Factory
------
Troubleshooting in the intermediate layers
Let's rewind back to troubleshooting the `oblasbench` container compile. The issue I mentioned happened in *Step 7*: ------ RUN git checkout tags/v0.2.18 && \ make CC="gcc -m64" FC="gfortran -m64" TARGET= && \ make install && \ ldconfig ------ The original `make` flags were copied from a Gist had some clear instructions on building OpenBLAS from source. That original `RUN` line looked like: ------ RUN git checkout tags/v0.2.18 && \ make CC="gcc -m64" FC="gfortran -m64" RANLIB="ranlib" FFLAGS=" -O2 -fPIC" TARGET= BINARY=64 USE_THREAD=1 GEMM_MULTITHREADING_THRESHOLD=50 NUM_THREADS=16 NO_AFFINITY=1 DYNAMIC_ARCH=1 INTERFACE64=1 && \ make install && \ ldconfig ------ The flags I found resulted in the following error: ------ Step 5 : COPY OpenBLAS.conf /etc/ld.so.conf.d/ ---> Using cache ---> 20a1fbb0d798 Step 6 : RUN git checkout tags/v0.2.18 && make CC="gcc -m64" FC="gfortran -m64" RANLIB="ranlib" FFLAGS=" -O2 -fPIC" TARGET= BINARY=64 USE_THREAD=1 GEMM_MULTITHREADING_THRESHOLD=50 NUM_THREADS=16 NO_AFFINITY=1 DYNAMIC_ARCH=1 INTERFACE64=1 && make install && ldconfig ---> Running in 64b59c47cdb0 [snip] make -j 1 -f Makefile.install install make[1]: Entering directory `/OpenBLAS' Generating openblas_config.h in /opt/OpenBLAS/include Generating f77blas.h in /opt/OpenBLAS/include Generating cblas.h in /opt/OpenBLAS/include Copying LAPACKE header files to /opt/OpenBLAS/include Copying the static library to /opt/OpenBLAS/lib make[1]: Leaving directory `/OpenBLAS' install: cannot stat 'libopenblas-r0.2.18.a': No such file or directory make[1]: *** [install] Error 1 make: *** [install] Error 2 ------ The failed build means no final container I can see in `docker images`, but let's look closer at *Step 5 & 6*. We can see that `docker build` is running a new container in *Step 6*, which is based on the intermediate layer from *Step 5*. A **checkpoint container** is a container we launch manually using that same intermediate layer that `docker build` uses to create the cache. The last line of *Step 5* is image layer id we want to use `20a1fbb0d798` for our checkpoint container, let's take a look at that image: ------ docker history 20a1fbb0d798 IMAGE CREATED CREATED BY SIZE COMMENT 20a1fbb0d798 21 hours ago /bin/sh -c #(nop) COPY file:0aefaff87b25769f6 18 B 01aaf43c0d50 22 hours ago /bin/sh -c #(nop) WORKDIR /OpenBLAS 0 B bbe3500e7e2d 22 hours ago /bin/sh -c git clone https://github.com/xiany 179.7 MB 7f0e79eee3c5 22 hours ago /bin/sh -c yum repolist && yum-config-manager 528.8 MB 4a6b6e1a17d7 4 weeks ago 201.6 MB Created by Image Factory ------ That's the history of the working build so far. We can go ahead and fire up a container that has the checkpoint we need and get a shell. ------ docker run -it 20a1fbb0d798 /bin/bash [root@1ca7e23a12c6 OpenBLAS]# pwd /OpenBLAS [root@1ca7e23a12c6 OpenBLAS]# git status # On branch develop nothing to commit, working directory clean ------ Now we can start in figuring out the right flags we need to get OpenBLAS to compile and install cleanly. We can run several experiments to find the fight optimizations for the environment. And if we need to, we can just launch a new checkpoint container to start from scratch. Once we've done that, we update the Dockerfile and exit the container. Since we've been working in a new running container, we haven't mucked about with the cache the build uses, `docker build` will pick right back up again at *Step 6* with the same image we were using for troubleshooting.A new way of making Dockerfiles
Using this pattern, we can improve our ability troubleshoot container images as we build them. It means making initial Dockerfiles to get a working build, then improving the Dockerfile to build to our standards for smaller layers and compounding some of our instructions. Let's take a look at the `scipy` section of the Dockerfile: ------ WORKDIR / RUN git clone https://github.com/scipy/scipy.git RUN yum -y install gcc-c++ WORKDIR /scipy RUN git checkout tags/v0.15.1 RUN python setup.py config_fc --fcompiler=gnu95 install ------ This looks like `bash history` output rather than a streamlined Dockerfile like the NumPY section. Each instruction is only doing one thing, which increases the number of layers. It also means we have a wider choice for creating checkpoint containers to do troubleshooting and additional experimentation. For example, the latest stable release of SciPY needs a later version of Cython that I had available in the container, so I needed to hunt around for a release tag in the git tree that compiled. One caveat, images can't have more than 127 layers, so we do need to balance checkpoints against total layer depth. Once we're satisfied with the way SciPY has been built and installed in the container, we can modify the Dockerfile to optimize for the build process and minimize image size. ------ ... INSTALL_PKGS="gcc-gfortran gcc binutils autoconf automake make git python-setuptools Cython python-devel gcc-g++" && yum -y install $INSTALL_PKGS RUN git clone https://github.com/xianyi/OpenBLAS && git clone https://github.com/numpy/numpy.git && git clone https://github.com/scipy/scipy.git ... WORKDIR /scipy RUN git checkout tags/v0.15.1 && python setup.py config_fc --fcompiler=gnu95 install ------ The `gcc-g++` RPM goes into the package list at the top and the `git clone` joins the other 2 `git clone` operations. We can eliminate the `WORKDIR /` since that was only needed to make sure the `git clone` happened in the right spot. Collapsing the resulting individual instructions to a single `RUN` means that we've taken the installation of SciPY down to 2 layers, one of which is a `cd` NOP. You could probably go further and change those to actual `cd` or `pushd/popd` commands in the `RUN` instructions to eliminate the NOP layers.TL;DR
Understanding the `docker build` process lets us take advantage of the multiple layers in docker container images. Using these intermediate build layers to build checkpoint containers means we can inspect, manipulate, and troubleshoot our build process in a sane and simple manner. Getting to know the Dockerfile format can improve your build process and resulting container images.Sidebar: Continous improvement
As I was writing this post, I noticed quite a few things that I could have done better or different in the build process. Changing the build order and detection of libraries to `numpy` from `scipy` made the overall process faster. It's always important to review what you're doing to see if there's a way to learn. Copyright (c) 2016 Copyright Holder All Rights Reserved.Related Blog Posts

Application Lifecycle, Federal Government, IT Infrastructure, Open Source
You can spend hours scrolling down the rabbit hole of government IT horror stories, which makes the recent launch of the federal website for ordering free COVID tests that much more remarkable. The website worked, and it was surprisingly easy to use. But that success belies decades of underinvestment in digital transformation that has stifled public sector innovation and hardened the government's low-tech image. For example:
Roland Alston
DevSecOps, Open Source
You say “DevOps”, I say “what about DevSecOps?”. But neither exists in a silo. If you’re taking advantage of DevOps tools and methods, you need to integrate DevSecOps into the mix. In other words, IT security must play an integrated role in the full lifecycle of your apps.
But what is DevSecOps? For this, we turn to DLT partner, Red Hat, who has put together a user-friendly guide to DevSecOps.
DLT Solutions

Open Source
Digital transformation, application modernization, faster service delivery – these terms are being thrown around so much that they’ve become so ubiquitous as to be meaningless.
What is digital transformation after all? For me, the best analogy is Blockbuster versus Netflix. Failing to anticipate the shift to on-demand and streaming entertainment, Blockbuster failed to futureproof its business model. It resisted digital transformation, and paid the price.
victoria.negron

Open Source
With pressure to better respond to evolving agency needs, do more with less, and all that jazz, government agencies are turning to modern tools and DevOps practices to help developers become more efficient in delivering innovative solutions.
victoria.negron
Open Source
Oh DevOps, DevOps.
You hear time and again how it’s the future of application development and deployment. You’re told you need to implement it and engrain its best practices across your organization.
But making a shift from the old way of doing things, however error-prone, slow, or disruptive it may be in comparison to the agility and utility that DevOps promises, is no easy task.
victoria.negron

Open Source
Open source application development and delivery tools provide compelling value for developers and often fill holes that commercial tools, with their relatively fixed function set, can’t fill. But a new report from Forrester, suggests that open source tools can’t do it all.
After surveying 150 U.S. application development and IT professionals, Forrester found that open source tools play an important role in the software delivery pipeline, they aren’t a silver bullet.
DLT Solutions

Open Source
When looking to build a microservice, you may have come across two pieces of advice; start with a monolith, and don’t start with a monolith. For a good number of us developers in the trenches, the point looks irrelevant because we already have a monolith, so one to-do completed and moving on. Not so fast! The discussion goes beyond the greenfield experience of where to start. Instead, within the “don’t start with a monolith” advice
michael.fitzurka

Open Source
With the growing necessity for companies to digitally transform, a lot of emphasis has been given to the microservices architecture, with its improved scalability and distributed design. While these facets may apply to some, adopting microservices is equally about the universal DevOps goals of improving lead times and reducing the batch size of releases, ultimately leading to more flexible and frequent production deployments of higher quality software.
michael.fitzurka

Open Source
2016 was a fantastic year for Open Source in the Enterprise. Red Hat gave us the exciting news that they had become the first $2 billion open-source company. As their first and largest government reseller, DLT was thrilled to have been a part of this journey with Red Hat achieving this benchmark success.
michelle.meadows
Open Source
2016 is/was the year Gartner predicted that DevOps would go mainstream. But a big challenge for government IT operations is how teams can modernize software development while still operating their traditional apps and infrastructure. After all, according to federal CIO Tony Scott, the U.S. government spends 76% of its $88 billion IT budget on operating and maintaining legacy technologies – that’s three times what is spent on modern systems.
DLT Solutions

Open Source, Uncategorized
DevOps is a powerful IT services management approach for the public sector. Implemented strategically, DevOps can help speed and efficiency in developing IT.
But where should agencies start? Instead of simply throwing DevOps as a new system at your agency and hoping for the best, different methods need to be used to best optimize workflows and impact.
MichelleMeadows

Open Source, Uncategorized
2016 is the year in which DevOps will go mainstream, predicts Gartner. But what does the Silicon Valley culture of agile development practices, open source, and DevOps culture mean for the government sector?
MichelleMeadows
IT Perspective, Open Source, Uncategorized
I am not going to go into the holy war of the JSON vs YAML discussion. That is something that should be left to folks that have time and willingness to discuss this, just like discussions of OS X vs Windows vs Linux, or VMware vs Xen, or iOS vs Android, or …the list could continue way past this blog. But this blog is not to discuss either/or. It is to show you a way to convert from one to another to ease the pain of dealing with one or the other side. Let’s take a simple JSON template for DynamoDB table creation in AWS.
AlexB

Open Source, Uncategorized
We’ve been touting the benefits of OpenStack® since its incubatory stages as a joint project between RackSpace and NASA. But what is OpenStack and why do 84% of enterprises plan to deploy it as the platform of choice for the cloud?
What is OpenStack?
admin
Open Source, Uncategorized
“Responsibility for secure open software is, well, complicated,” writes Government Computer News. It’s not just complicated; it’s also perhaps one of the most misunderstood aspects of open source software development.
You’ve no doubt read that open source software (OSS) is more secure than proprietary software because the code is genuinely hardened thanks to reviewers in the open source community who have tested it, tried to break it, and then fixed the problems they uncover.
Caron Beesley

Open Source, Uncategorized
David Blankenhorn, DLT’s Chief Cloud Technologist, recently sat down with fedScoop TV to discuss the importance of open source software for government. In addition to providing an overview of the open source landscape, David includes recommendations for agencies exploring open source options.
Chris Thorne